Entradas

Don’t worry, be happy!

Imagen
Hello crafty friends! Today I show you this interactive card with lights  that I made with Chibitronics LED Stickers .  To start I stamped the stamps from “Whimsy Stamps” and painted them with Copics markers.  The background is a patterned paper and scalloped die which are also from Whimsy Stamps. 😍  Once we have the card laid out, we have to assemble the circuit: for this I used the “ Conductive Fabric Tape ” and the Chibitronics LED Stickers . The circuit works with a CR2032 battery, below is the photo of the circuit.  Finally I glued all the pieces and that's it!  Here you have the result, I hope you like it!  Until next time! 🙋🏽‍♀️ Laura

Bee happy!

Imagen
Hello Crafty friends! Today I show you this “Clean and simple” style card that I made for the Whimsy Stamps design team.  To start, I stamped the “ Bee happy ” stamps with black “Memento” ink and then painted them with “Copic Makers” alcohol markers, which are ideal for grading colors and giving it a more realistic look! 😉  Next I prepared the background: for this I used the “ Wonky Stitched Rectangles ” dies that I love for this type of cards! 😍 Next I used Distress Oxide inks and made some black watercolor splatters. Then I cut the “ Honeycomb Pattern ” die in orange cardstock, prepared the composition and glued all the pieces with “Nuvo” glue.  Lastly I added the sentiment with black Versafine ink. I hope you like the result!  Don't forget to follow me on my Instagram profile @lady_laura_crafts so you don't miss anything! 🙋🏽‍♀️ Thank you!

Mermaid moments card

Imagen
Hello crafty friends! Today I'm showing you this mermaid card I made for the Whimsy Stamps design team. To start, I stamped the “ Mermaid moments ” stamps with black “Memento” ink and then painted them with “Copic Makers” alcohol markers, which are ideal for grading colors and leaving a more realistic look! 😉 Next I prepared the background: for them I used an A2 size cardboard to which I made a gradient with Altenew inks, which are wonderful, and then I made some gold splashes to give it a bit of contrast. To simulate the sand I cut a strip of “Wavy Pierced rectangles ” dies and painted it with Distress inks, then I made some splashes with brown watercolor.  On the other hand, I cut the “ Build an Ocean ” dies and painted them with Distress Oxide inks.  I prepared the entire composition, glued all the pieces with “Nuvo” glue, which is fabulous, and finally added the sentiment with black Versafine ink. I hope you like the result!  Until next time! 🙋🏽‍♀️ Laura

Hope you better soon!

Imagen
Hello Ladies! How are you? Today I'm stopping by to show you this Clean and simple style card I made for the Studio Light NL design team using some of their new products! ☺️  I encourage you to stop by their store because they have some beautiful products!! 😍   Studio Light Store See you next time!! All the best! Laura 

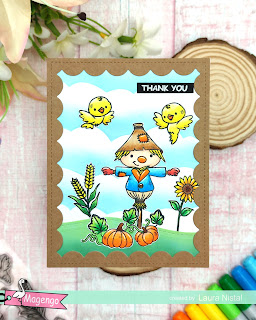
Fall card with Magengo Designs Stamps

Imagen
Hello crafty friends! I'm Laura and I'm very excited because today I'm showing you my first project as DT for Magengo Design. I hope will inspire you!  To start I used the " Good Vibes " stamps that I stamped with the black "Memento" ink which for me is the best there is to use with these stamps. Then I painted all the figures with alcohol markers. To give them a little more detail I used a black "Micron Pigma" and the white Gelly roll to create highlights and shadows. Next I prepared the background: for this I used a white cardboard on which I painted a sky with "Distress Oxide" inks and I used a stencil to make the clouds. With a die I made the ground simulating a meadow and I put a frame to give it more prominence. For the sentiment I used a black cardboard and the word "Thank you" that comes in the same set and that I stamped with the white ink "Memeto Luxe". Finally I prepared the composition, glued all the pi...